One of the most common questions I get is “how do I build a hillclimb bike?” For the uninitiated, hillclimb can look like an awful lot of fun, but it’s clear the bikes have been modified specifically for the purpose, so here’s a few tips about getting your machine set up for hillclimb.
First of all, look around the area you’re in (or that you intend to compete in) and see what kinds of hillclimb events are available. The bike you build will need to fit into a class that exists at those events, and abide by the rules of that series. As one might imagine, there’s less modification necessary to compete in amateur events than there is if you intend to compete in pro events. And if you’re just starting out…you probably want to stick to amateur events for a while.
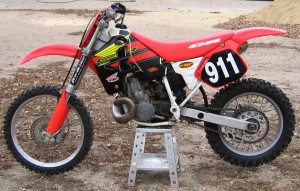
Let’s assume that there’s amateur events around…for the most part, you can start with pretty much any motocross or off-road race bike and fit it into an amateur class. So go off and find yourself a race bike to start with – say, a Honda CR500:
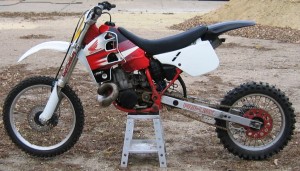
The CR500 is an incredibly popular machine for hillclimb, as it competes well in some class in pretty much any series you can find, they’ve been around forever and people know how to make them fast, they’re reliable and dependable, so on and so forth. The picture above is a “normal” CR500 – like you’d buy to go motocrossing or as a play bike. Here’s a photo of a CR500 that’s all set up for hillclimb:
With any luck, you’ve spotted the primary difference – this one is a bit longer than the other one. Which leads us to the 3 primary things you need to do to a “regular” dirt bike to turn it into a hillclimber:
- Swingarm extensions
- Tethered kill switch
- Rear shock modification
The first one, as you can see in the photo, is pretty obvious. Because these bikes are used to, you know, climb hills…you want to extend the wheelbase to help keep the front wheel on the ground. On a stock-length bike, when you’re trying to climb a steep hill, it can be challenging to keep the bike from wheelieing and wanting to flip over backwards. It’s just physics. By making the wheelbase longer, you change the primary leverage ratio and the machine will be more planted on the ground, and it will be much easier to keep the front end down. The easiest way to lengthen the wheelbase is to get a set of bolt-on swingarm extensions. While any good machinist should be able to figure out what you’re doing and carve a set out of aluminum for you, you might start by talking to folks already in the sport in your area and ask them where they got their extensions made. Someone might even have a used set for sale…and of course you could post on our forums to see if anyone has any for sale, or can point you to a local resource as well.
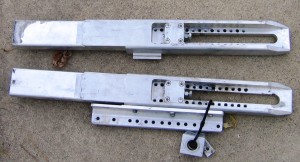
There’s a few basic ways to design a set of extensions – here’s a photo of a particularly good set so you can get the idea:
These extensions are actually made for a CR500 – the front 4″ or so actually slides inside the swingarm (after you remove the stock chain adjuster bits, which just requires removing a few screws and pulling them out of the swingarm). And then, in this case, there’s bolts that will screw into the extensions from the inside of the swingarm to secure them. This particular set has moveable adjuster blocks, so that you can change the effective length of the swingarm to accomodate different conditions, or different rider preferences. For most riders on most hills at an amateur event, you’ll probably find yourself running a CR500 someplace between 6″ and 9″ over stock length.
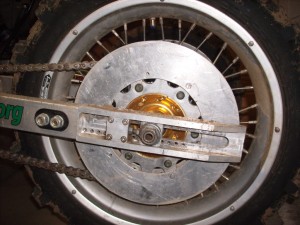
On the extensions in the photo above, you can also see an attachment that allows the chain guide to be placed in multiple positions to accommodate whatever length you’re running at, and on the extension on the top (which is actually upside-down in the photo) there’s even a little bracket for the brake caliper to slide onto. Although, many extensions will just let the CR500 brake caliper rest right against the extension itself, which generally works fine. Here’s a few close-up photos of extensions installed on a bike:
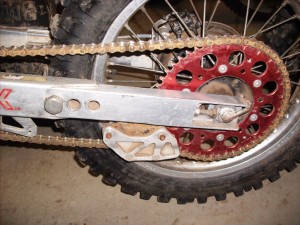
The first photo in this series shows extensions with a similar design to the first ones we showed you, but because that’s not a CR500 swingarm, the design is slightly different…obviously, different machines have different swingarms, and your extensions will have to be built to fit your specific swingarm. In this case you can see the bolts that secure the extensions to the swingarm via the standard axle hole. One other thing on that first image – you’ll notice that there’s no chain guide, but there is a big aluminum disk mounted to the sprocket. Actually, there’s 2 – one on each side, spaced out to allow just enough room for the chain to get around the sprocket without interference, but with no extra room so that the chain is effectively prevented from ever coming off. No need for a chain guide on this machine, because the only way that chain is coming off that sprocket is if it actually snaps. Because you’re going to be running a much longer drive chain, it’s important that you properly attend to keeping the chain on your sprockets…running a chain guide very close to the rear sprocket usually is fine for most bikes, but these plates are kind of foolproof if you have any issues with your bike tossing its chain.
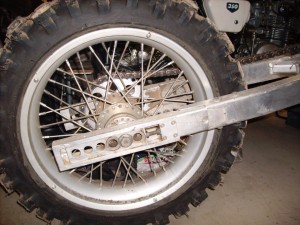
If you look at the 2nd photo there, you can see a markedly different design on those extensions…the effective length in this case is changed by sliding the extensions farther in or out of the swingarm, using the different holes towards the front to secure them in place as desired. Just a simpler design than the first set we looked at.
The 3rd photo shows yet another design, where the effective wheelbase is changed by putting the axle through a different hole in that big slider. As you can see, there’s more than one way to design a set of extensions…whether simple or sophisticated in design, at the end of the day there’s a number of different ways to get the job done.
Naturally, as noted above, you’re going to need a longer drive chain too – generally speaking, what you want to do is to just cut an extra length of chain to add to the original chain to get it to the required length. Which means you’ll have 2 master links instead of just one. Don’t worry about having one continuous length of chain with only 1 master link – if you change your gearing, or extension length, you’re going to have to add or subtract links anyway. Most hillclimbers will have a small assortment of extra chain lengths in their toolbox to accommodate whatever gearing and/or extension length they wind up running on any given day.
You may see some bikes with extensions that have been welded on – or even completely new swingarms that were fabricated at hillclimb length. The only downside to those approaches would be that you can’t easily make your bike stock length again if you wanted to – on our CR500 example, we could bolt the extensions on for a hillclimb, then take them back off and go trail riding in a matter of minutes. Then again, if you’re building a bike whose sole purpose is going to be to compete in hillclimb, there may never be any need to make it stock length.
The other thing you may need to do when you stretch your swingarm is to get a longer brake hose for your rear caliper, so that it can make it all the way to the farthest point the wheel might be. Having said that, though, you’ll see lots of hillclimbers with no rear brake at all – you can just remove the whole rear brake system, and use a spacer of some kind to account for the caliper not being there on the rear axle. In fact, if you walk into your local hardware store with your axle in hand, you’ll find washers that will fit well enough to serve the purpose…just buy enough of them and, although it may seem like a bit of a jerry-rigged setup, they’ll take the place of the caliper just fine. Just make sure that your front brake is in good working order if you completely remove the rear brake…
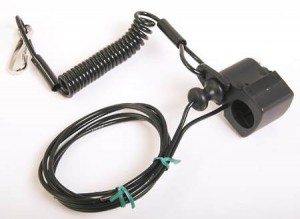
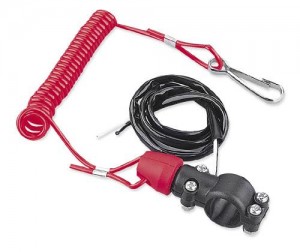
On to point #2 – the tethered kill switch. This is an easy one…hillclimb rules specify that you must have a tethered kill switch (kind of like what you might have on a jet ski) that will kill the engine if the rider and machine part ways. Here’s a couple examples of what they look like:
Make sure you get one that’s wired properly for your application – the vast majority of such switches are designed to plug into traditional dirt bikes. If you’re building a machine with a street bike motor, or have some other application where a battery is necessary to make your electronics work, you may need one that’s intended for use with street bike systems. You can buy or order tethered kill switches at any motorcycle dealer – just make sure they know the application for it so you get the correct kind.
For the most part, hooking the switch into your system is pretty easy. Especially on a dirt bike, where if you like you can probably just unplug the stock pushbutton kill switch and plug the tether switch in the same way. Otherwise, just follow the directions that should come with the switch and graft it into your wiring as directed. Be sure to test that the switch works properly before heading to a hillclimb.
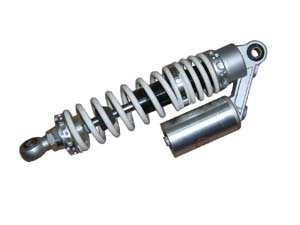
And finally, let’s talk briefly about your rear shock. Obviously, the swingarm is nothing more than a lever that applies a multiplied force to your shock. Make that lever longer, and the multiplication gets higher…effectively making your rear suspension softer.
So you’re almost certainly going to need to invest in some shock mods. At a bare minimum, you’re going to want a heavier shock spring. Probably a couple steps stiffer than stock at least, and possibly custom-wound if you’re planning on running really long, and/or you’re a heftier rider. While many people probably just swap out the spring and leave it at that, you really should have the valving adjusted to compensate for the higher spring rate – the rebound damping, for example, will likely need to be slowed down considerably so that the new spring doesn’t turn your shock into a pogo stick.
If the bike you’re using is going to be used for stuff other than hillclimb too (which is why your extensions are just bolt-ons, right?), you may want to pick up a 2nd shock to swap when you’re going to and from hillclimb-spec. That way you can have a completely different shock, just set up for hillclimb, and not mess up the shock you use for motocross or play riding. Obviously that costs a little extra money, but if your bike is going to serve 2 purposes it’s going to be worth it.
So there you have it – those 3 things are the basics that you need to deal with to take a regular dirt bike and get it ready to hillclimb. Naturally, if you’re wanting to do something a little more “serious,” like build a 750cc or Open class machine with a motor from a street bike, the process is going to be a little more involved – usually those projects start with a rolling chassis from some donor motocross bike, and the desired street bike motor you want to use – and then lots of cutting, welding, and general fabrication commences to get that big motor stuffed into that little frame. Chances are you might want some professional help with a project like that – again, ask around for who local bike builders are in your neighborhood to start with. And you probably want to get your feet wet with something a little less committal – like the CR500 we’ve been talking about.
Be sure to read the rulebook for the series you’re going to compete in…if it’s a pro or semi-pro series, you can probably run a paddle tire, or maybe even use metal traction devices (like bolts or chains). If it’s an amateur series, you’re probably restricted to regular knobby tires. Amateur series will limit you to regular gasoline fuels, whereas a pro series might let you run methanol, nitro methane, nitrous oxide, etc. – none of which are things you probably want to start trying to do without some expert assistance.
Obviously, there’s other things you can do, even if you’re just competing in an amateur series. You can port that CR500 cylinder, do head mods, put a big carb on it, so on and so forth. Because hillclimbers really only run for a few seconds at a time, there can be a tendancy to build motors all the way out to the limit – way beyond what you could get away with for motocross. Just be aware that if you mod that motor for absolute power for hillclimb, it may no longer be ridable for motocross or anything else.
Anyway, hopefully that information will help you get underway with your hillclimber project. Any questions or comments, put a post in our forums…and see you at the hill!

